Custom designed replacement housing fits Switch Joy-Con. The ergonomic D-pad button (D-pad) greatly improves the functionality of the left Joy-Con, making it ideal for intensive gaming.
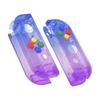
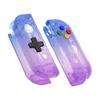
A unique replacement case that adds even more personality to your device. Gone is the boring standard gray color.
For the installation process, customers should have moderate electronic installation experience. Please note that installing this case will void your controller warranty. Search "JoyCon Dpad Guide Extremerate" or "cTajxu8ZpzI" on YouTube to watch the installation video guide. Watch videos at half speed. I think you should watch, pause, run, repeat.
Made of premium ABS material, durable and practical. Although the clear color looks nice, it is not 100% clear, so please check before purchasing.
The package includes a Joy-Con replacement case compatible with Switch and Switch OLED (electronic parts not included), a full set of buttons, PH00, Y00 screwdriver set and spare screws.
Tired of the old standard gray color?
Shall we start remodeling now?
A great customization option for switch DIY enthusiasts.
Please understand before purchasing:
Please don't misunderstand that it's a Switch Joy-Con. In fact, they are just a Switch compatible housing (D-Pad version) and a full set of buttons. And it doesn't contain any electronic parts. Console, joy-con and other parts are not included. Console case not included.
For the installation process, customers should have moderate electronic installation experience. Please note that installing this case will void your controller warranty. Search "JoyCon Dpad Guide Extremerate" or "cTajxu8ZpzI" on YouTube to watch the installation video guide.
Product features:
Completely upgrade your Switch and Switch OLED to your own level of exclusive style.
Compatible with Switch and Switch OLED.
Ergonomic D-pad button (D-pad), left Joycon functionality has been greatly improved, perfect for intensive gaming.
Product made of durable non-toxic ABS plastic.
Made of premium ABS material, durable and practical. The matte and transparent clear color system looks nice, but it is not 100% clear, so please check before purchasing.
Installation guide
Difficulty: high
Time: May take 3 hours or more
Take it easy. Check all connections and organize screws.
I watch YouTube videos and often pause and play them.
When reassembling the Joy-con, you need to be aware of how tight you are tightening the screws, as this will affect how the buttons are pressed.
Be sure to use a tri-wing screwdriver when removing the external screws of the Joy-con. Be careful not to strip the four outer triangular screws or over-tighten them.
There are many delicate ribbon cables that need to be removed and reinstalled.
Always use tweezers instead of your fingers so you can move small parts into the new case.
Joy-con ZR and ZL have springs, so be careful when opening them.
Package includes:
Left Joy-Con four-way key housing *1, with middle tray
Right joy-con housing*1, with middle tray
L button*1
R button*1
A/B/X/Y button*1
D-pad*1
Direction button*1
SL button*2
SR button*2
ZL button*1
ZR button*1
PH00 driver*1
Y00 driver*1
screw *33
Spring *6